
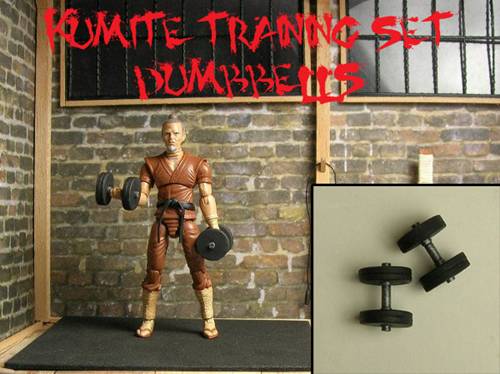
Post by Daremo on Oct 7, 2012 13:23:32 GMT -5
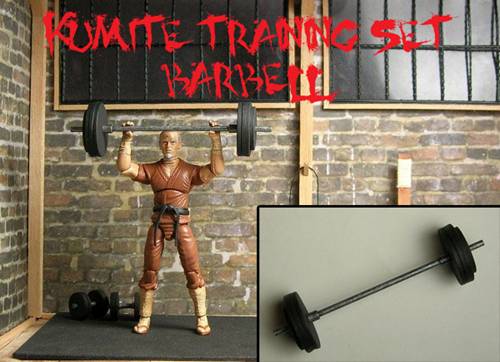
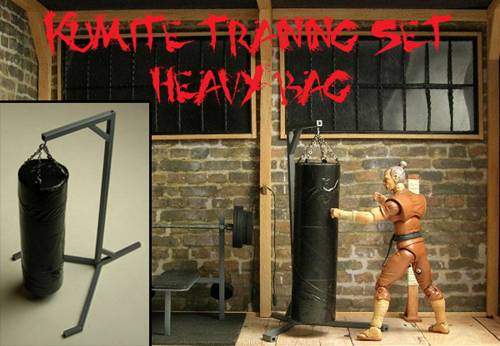
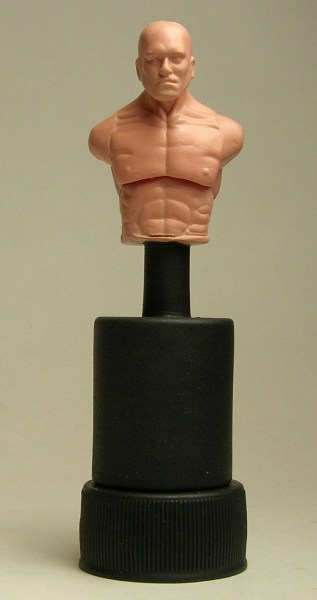
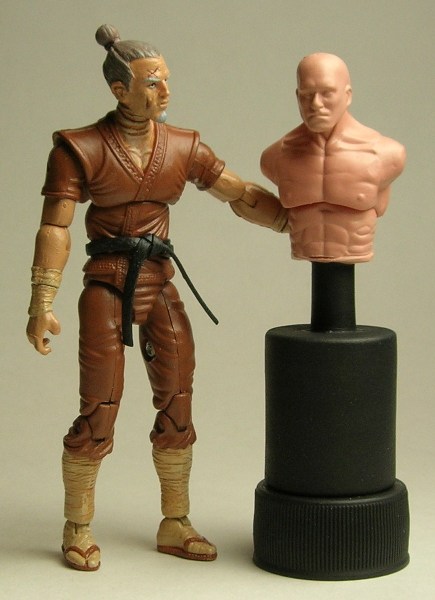
Make your own Kumite Training Set

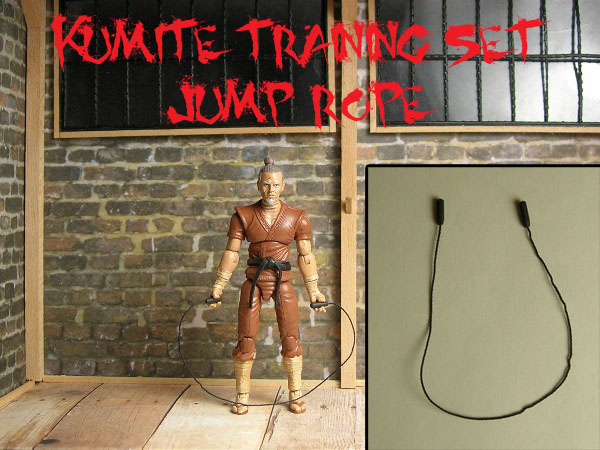
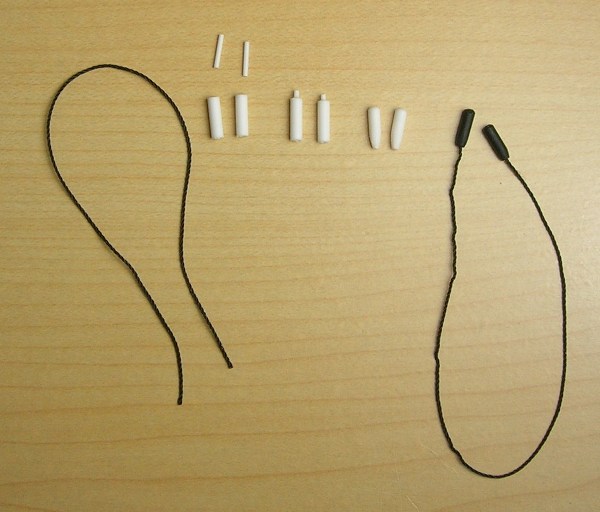
Gather these materials:
3/32" Tube .093 Dia. (2.4 mm) Styrene Item 223
.035 Rod (0.88 mm) Styrene Item 220
Black Thread (something thicker than sewing thread)
Glue (I'm using cyanoacrylate glue whenever glue is mentioned)
-Cut two 5/16" sections of the 3/32" tube
-Glue the .035 rod into one end of each tube (leave enough room to glue the black thread into the other end) and trim the excess so it's flush
-Round the top (end with the rod glue in place) and taper the bottom (where the black thread will go) of each piece of tubing with a file or sanding stick
-Prime and paint it, then glue the ends of a 6" piece of black thread into each tube.
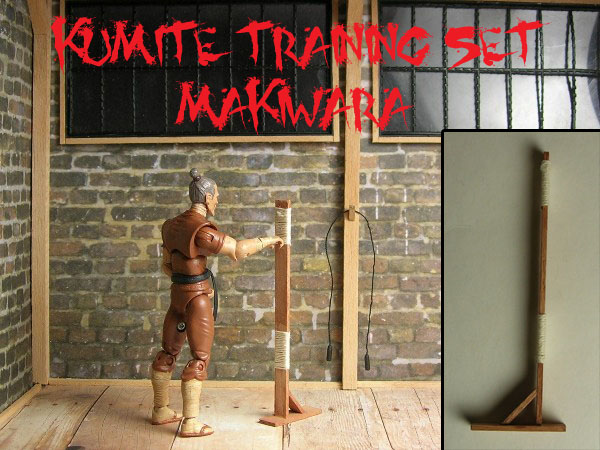
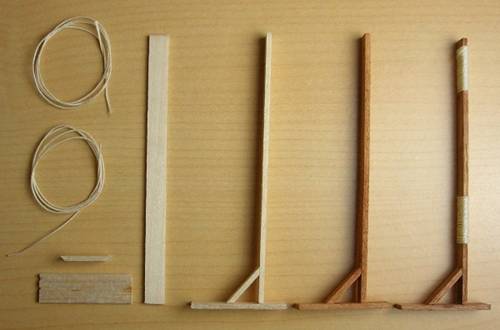
Gather these materials:
1/16" x 3/8" Balsa Wood
1/16" x 1/4" Balsa Wood
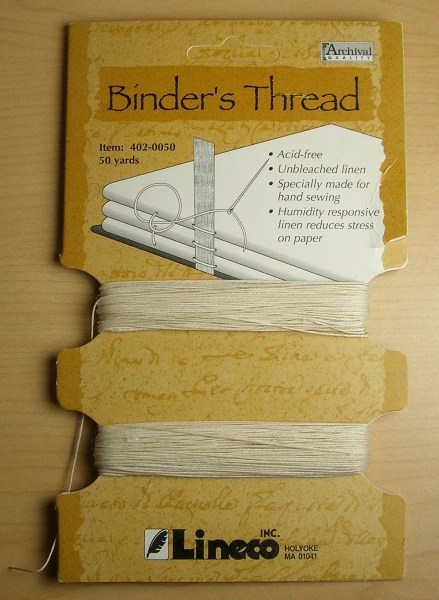
Binders Thread
-Cut a 1 3/16" piece from the 1/16" x 3/8" balsa wood, a 3 1/2" piece of the 1/16" x 1/4" balsa wood, a 5/8" piece of the 1/16" x 1/4" balsa wood with 45° angle ends, and two 14 1/2" pieces of binders thread
-Glue the 3 1/2 " piece to the 1 3/16" piece 5/16" from the end of the base
-Glue the short angled cut piece in the corner of the first two pieces
-Use a brown/reddish brown wash over the whole piece
-Take one of the binders thread piece and glue it to the back of the makiwara, 1/8" from the top. Wrap it downwards around the balsa wood unitl you reach the end of the binders thread. Cut the thread so that you can glue it on the back of the makiwara
-Take the other piece of binders thread and glue it to the back of the makiwara, 7/8" from the bottom of the base. Wrap the thread upawards around the basla wood unitl you reach the end of the binders thread. Cut the thread so that you can glue it on the back of the makiwara

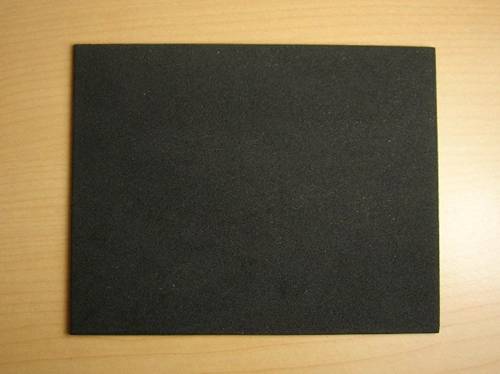
Gather this material:
Creatology Fun Foam 12" x 18" Black Foam Sheet
-Cut out a 4" x 5" section of the foam
-Cut out a bigger piece if you want a bigger workout area
Gather these materials:
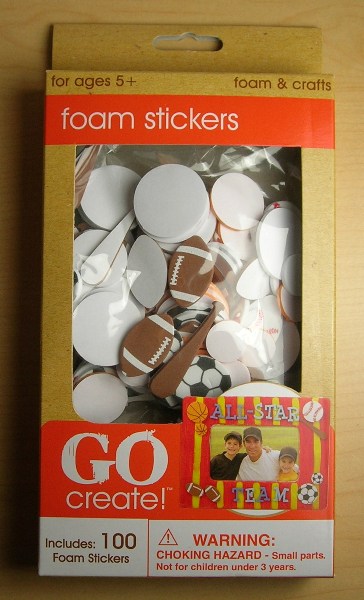
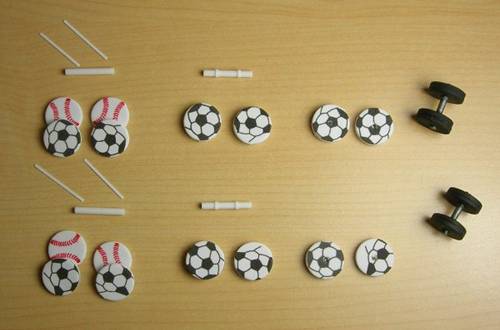
8 Small Foam Circles from the Go Create Foam Stickers (the sports pack)
.100" Rod (2.5 mm) Styrene Item 213
.010 x .040" Strip (0.25 x 1.0 mm) Styrene Item 102
-Cut two 3/4" sections of the rod and four 3/4" sections of the strips
-Remove the backing from two of the small foam circles and stick them together. Repeat this with the other six foam circles
-Glue one strip 7/32" from each end around the rods. Trim the excess
-Drill holes into the middle each of the foam pieces (don't make the holes bigger than diameter of the rod)
-Prime and paint the rods, paint the foam pieces black
-Slide the foam pieces onto the ends of each completed rod
Gather these materials:
2 Medium Foam Circles
6 Large Foam Circles
.100" Rod (2.5 mm) Styrene Item 213
5/32" Tube .156 Dia. (4.0 mm) Styrene Item 225
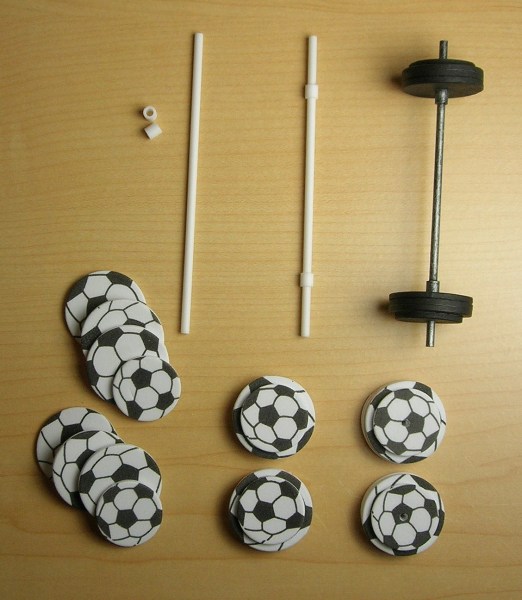
-Cut a 3 1/2" piece of the rod and two 3/16" sections of the tubing
-Glue the sections of tubing 5/8" from the each end of the rod
-Remove the backing from two of the large foam circles and stick them together. Remove the backing of another large foam circle and stick it to the first two foam circles. Remove the backing from the medium foam circle and stick it to (keep it centered) the three large foam circles. Repeat this with the other four foam circles
-Drill holes into the middle each of the foam pieces (don't make the holes bigger than diameter of the rod)
-Prime and paint the rod, paint the foam pieces black
-Slide the foam pieces onto the ends of the completed rod
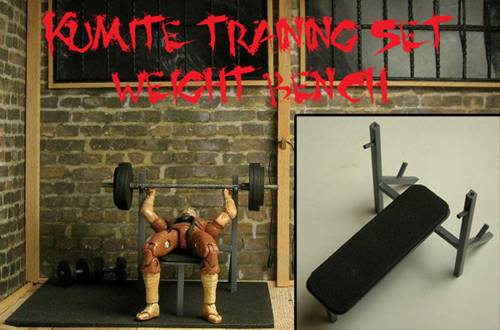
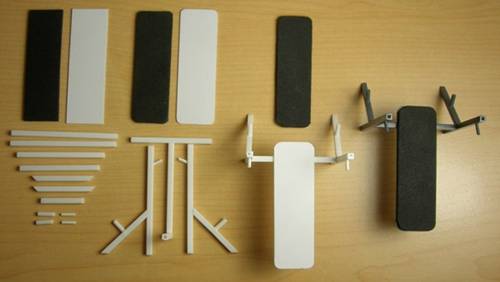
Gather these materials:
Plain .030" Thick (0.75 mm) Styrene Sheet Item 9030
Square Tube 1/8" (.125") (3.2 mm x 3.2 mm) Styrene Item 252
.100" Rod (2.5 mm) Styrene Item 213
1/16" Rod .062 Dia. (1.6 mm) Styrene Item 222
Creatology Fun Foam 12" x 18" Black Foam Sheet
-Cut out a 29/32" x 2 25/32" piece of the styrene sheet, a 7/8" x 2 3/4" piece of the black foam sheet, two 2 1/2" sections of square tubing, two 1 7/16" sections of squared tubing with 45° angle ends, one 2 1/16" section of squared tubing, one 1 7/8" section of squared tubing, one 1" section of squared tubing, two 3/8" pieces of the larger rod, and two 5/16" pieces of the smaller rod
-Round the corners of the black foam piece with scissors and the styrene sheet with a file or sanding stick
-Drill a hole into the top of each 2 1/2" section of squared tubing at an angle for the smaller rods 3/8" from the top (the barbell will rest on these)
-Drill a hole into the middle of the longest side of each 1 7/16" sections of squared tubing with 45° angle ends for the larger rods (you can store the extra weights on these)
-Glue the rods into the appropriate holes, making sure to keep the smaller rods at a 45° angle
-Glue the angled cut squared tubing to the 2 1/2" upright sections (the longer side will be 1" from the bottom of the upright)
-Glue the 2 1/16" section of squared tubing to the middle of the 1 7/8" section of squared tubing and then glue the 1" section of squared tubing to the end of the 2 1/16" piece
-Glue the 2 1/2" upright sections of square tubing to each side of the 1 7/8" section of squared tubing. They will form the feet of the bench along with the 1" piece of squared tubing
-Glue the 29/32" x 2 25/32" piece of the styrene sheet to the top of the bench (centered of course), it should hang off 1/8" on the front by the 1" piece of squared tubing.
-Prime and paint the bench and then glue the black foam to the top of the styrene sheet (once again centered)
Gather these materials:
Four Medium Foam Circles
Four Small Foam Circles
-Remove the backing from two of the small foam circles and stick them together. Remove the backing from two of the medium foam circles and stick them together. Repeat this with the other four foam circles
-Paint the foam pieces black
Gather this material:
Square Tube 1/8" (.125") (3.2 mm x 3.2 mm) Styrene Item 252
Black Garbage Bag
Creatology Foam Shapes Marshmallow
Chain Blued Steel 20 Links Per Inch
.22 Gauge Wire
Double Sided Tape
-Cut one 4 5/8" section of the squared tubing, two 2" sections of the squared tubing with one 45° angle cut on each, two 1 1/2" sections of the squared tubing, two 3/4" sections of the squared tubing with a 45° angle cut on the ends of each, two 1/2" sections of the squared tubing with one 45° angle cut on each
-Glue one 1 1/2" section of squared tubing to the end (bottom) of the 4 5/8" section and then the other 1 1/2" section to the side of the 4 5/8" section at the top.
-Glue the short double angle cut pieces in the corners
-Glue the two 1/2" angle cut sections the the flat ends the 2" section pieces
-Glue the 2" sections the bottom of the main section and trim the excess off support legs (the two 1/2" angle cut pieces)
-Drill a small hole in the middle of the top piece 1/16" from the end (this will be where the hook for the bag goes)
-Prime and paint
-Cut a 3 1/2" x 3 1/2" section, two 1 1/4" diameter circles, and four 3/32" x 1/2" strips out of the garbage bag
-Use the double sided tape between the ends of the foam marshmellows and then go around the sides where they meet
-Glue the the garbage bag circles to the top and bottom of the foam marshmellow stack. Glue the edges along the side of the stack
-Cut four 13 link chains and then make four rings using the .22 gauge wire
-Attach a ring to each chain and then glue the garbage bag strips around each
-Glue the strips to the top of the bag making sure they're spaced evenly apart
-Use the double sided tape around the top and bottom of the bag and then wrap the garbage bag sheet around it
-Glue the end of the sheet down
-Make a jack stay eyebolt with the .22 gauge wire. Make a 90° bend 1/8" from the eye (ring) of the jackstay eyebolt
-Hook all four chains to the eye and close it (easier said than done, this will test your patience)
-Insert the hook of the bag into the heavy bag frame
You can make all sorts of different training equipment. Look for some reference photos of what you want to make. Try to get an idea of how you might be able to make it and then start gathering materials. While constructing your piece, you might find that some things don't work. Keep trying other ideas until you find something that works. Trial and error is a big part of customizing and is one of the ways that we get better at doing what we do.
Gather these materials:
3/32" Tube .093 Dia. (2.4 mm) Styrene Item 223
.035 Rod (0.88 mm) Styrene Item 220
Black Thread (something thicker than sewing thread)
Glue (I'm using cyanoacrylate glue whenever glue is mentioned)
-Cut two 5/16" sections of the 3/32" tube
-Glue the .035 rod into one end of each tube (leave enough room to glue the black thread into the other end) and trim the excess so it's flush
-Round the top (end with the rod glue in place) and taper the bottom (where the black thread will go) of each piece of tubing with a file or sanding stick
-Prime and paint it, then glue the ends of a 6" piece of black thread into each tube.
Gather these materials:
1/16" x 3/8" Balsa Wood
1/16" x 1/4" Balsa Wood
Binders Thread
-Cut a 1 3/16" piece from the 1/16" x 3/8" balsa wood, a 3 1/2" piece of the 1/16" x 1/4" balsa wood, a 5/8" piece of the 1/16" x 1/4" balsa wood with 45° angle ends, and two 14 1/2" pieces of binders thread
-Glue the 3 1/2 " piece to the 1 3/16" piece 5/16" from the end of the base
-Glue the short angled cut piece in the corner of the first two pieces
-Use a brown/reddish brown wash over the whole piece
-Take one of the binders thread piece and glue it to the back of the makiwara, 1/8" from the top. Wrap it downwards around the balsa wood unitl you reach the end of the binders thread. Cut the thread so that you can glue it on the back of the makiwara
-Take the other piece of binders thread and glue it to the back of the makiwara, 7/8" from the bottom of the base. Wrap the thread upawards around the basla wood unitl you reach the end of the binders thread. Cut the thread so that you can glue it on the back of the makiwara
Gather this material:
Creatology Fun Foam 12" x 18" Black Foam Sheet
-Cut out a 4" x 5" section of the foam
-Cut out a bigger piece if you want a bigger workout area
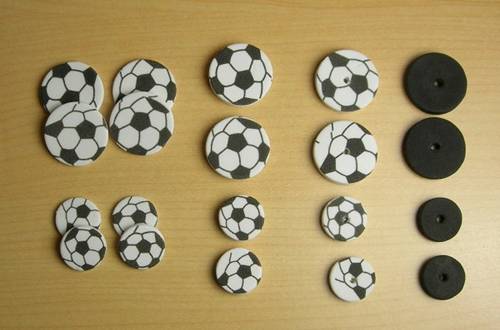
Gather these materials:
8 Small Foam Circles from the Go Create Foam Stickers (the sports pack)
.100" Rod (2.5 mm) Styrene Item 213
.010 x .040" Strip (0.25 x 1.0 mm) Styrene Item 102
-Cut two 3/4" sections of the rod and four 3/4" sections of the strips
-Remove the backing from two of the small foam circles and stick them together. Repeat this with the other six foam circles
-Glue one strip 7/32" from each end around the rods. Trim the excess
-Drill holes into the middle each of the foam pieces (don't make the holes bigger than diameter of the rod)
-Prime and paint the rods, paint the foam pieces black
-Slide the foam pieces onto the ends of each completed rod
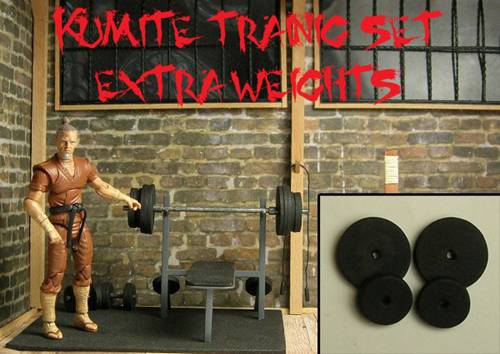
Gather these materials:
2 Medium Foam Circles
6 Large Foam Circles
.100" Rod (2.5 mm) Styrene Item 213
5/32" Tube .156 Dia. (4.0 mm) Styrene Item 225
-Cut a 3 1/2" piece of the rod and two 3/16" sections of the tubing
-Glue the sections of tubing 5/8" from the each end of the rod
-Remove the backing from two of the large foam circles and stick them together. Remove the backing of another large foam circle and stick it to the first two foam circles. Remove the backing from the medium foam circle and stick it to (keep it centered) the three large foam circles. Repeat this with the other four foam circles
-Drill holes into the middle each of the foam pieces (don't make the holes bigger than diameter of the rod)
-Prime and paint the rod, paint the foam pieces black
-Slide the foam pieces onto the ends of the completed rod
Gather these materials:
Plain .030" Thick (0.75 mm) Styrene Sheet Item 9030
Square Tube 1/8" (.125") (3.2 mm x 3.2 mm) Styrene Item 252
.100" Rod (2.5 mm) Styrene Item 213
1/16" Rod .062 Dia. (1.6 mm) Styrene Item 222
Creatology Fun Foam 12" x 18" Black Foam Sheet
-Cut out a 29/32" x 2 25/32" piece of the styrene sheet, a 7/8" x 2 3/4" piece of the black foam sheet, two 2 1/2" sections of square tubing, two 1 7/16" sections of squared tubing with 45° angle ends, one 2 1/16" section of squared tubing, one 1 7/8" section of squared tubing, one 1" section of squared tubing, two 3/8" pieces of the larger rod, and two 5/16" pieces of the smaller rod
-Round the corners of the black foam piece with scissors and the styrene sheet with a file or sanding stick
-Drill a hole into the top of each 2 1/2" section of squared tubing at an angle for the smaller rods 3/8" from the top (the barbell will rest on these)
-Drill a hole into the middle of the longest side of each 1 7/16" sections of squared tubing with 45° angle ends for the larger rods (you can store the extra weights on these)
-Glue the rods into the appropriate holes, making sure to keep the smaller rods at a 45° angle
-Glue the angled cut squared tubing to the 2 1/2" upright sections (the longer side will be 1" from the bottom of the upright)
-Glue the 2 1/16" section of squared tubing to the middle of the 1 7/8" section of squared tubing and then glue the 1" section of squared tubing to the end of the 2 1/16" piece
-Glue the 2 1/2" upright sections of square tubing to each side of the 1 7/8" section of squared tubing. They will form the feet of the bench along with the 1" piece of squared tubing
-Glue the 29/32" x 2 25/32" piece of the styrene sheet to the top of the bench (centered of course), it should hang off 1/8" on the front by the 1" piece of squared tubing.
-Prime and paint the bench and then glue the black foam to the top of the styrene sheet (once again centered)
Gather these materials:
Four Medium Foam Circles
Four Small Foam Circles
-Remove the backing from two of the small foam circles and stick them together. Remove the backing from two of the medium foam circles and stick them together. Repeat this with the other four foam circles
-Paint the foam pieces black
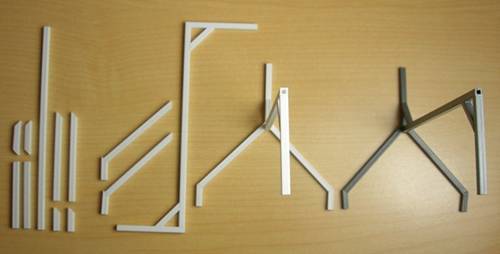
Gather this material:
Square Tube 1/8" (.125") (3.2 mm x 3.2 mm) Styrene Item 252
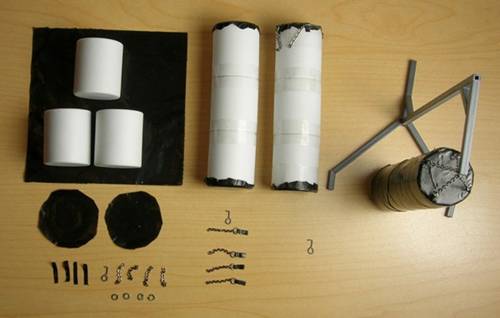
Black Garbage Bag
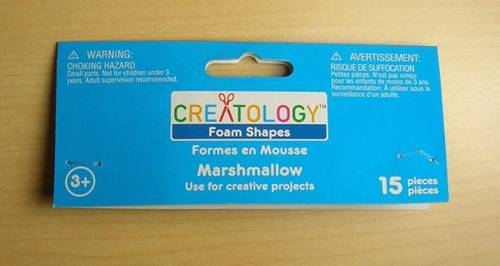
Creatology Foam Shapes Marshmallow
Chain Blued Steel 20 Links Per Inch
.22 Gauge Wire
Double Sided Tape
-Cut one 4 5/8" section of the squared tubing, two 2" sections of the squared tubing with one 45° angle cut on each, two 1 1/2" sections of the squared tubing, two 3/4" sections of the squared tubing with a 45° angle cut on the ends of each, two 1/2" sections of the squared tubing with one 45° angle cut on each
-Glue one 1 1/2" section of squared tubing to the end (bottom) of the 4 5/8" section and then the other 1 1/2" section to the side of the 4 5/8" section at the top.
-Glue the short double angle cut pieces in the corners
-Glue the two 1/2" angle cut sections the the flat ends the 2" section pieces
-Glue the 2" sections the bottom of the main section and trim the excess off support legs (the two 1/2" angle cut pieces)
-Drill a small hole in the middle of the top piece 1/16" from the end (this will be where the hook for the bag goes)
-Prime and paint
-Cut a 3 1/2" x 3 1/2" section, two 1 1/4" diameter circles, and four 3/32" x 1/2" strips out of the garbage bag
-Use the double sided tape between the ends of the foam marshmellows and then go around the sides where they meet
-Glue the the garbage bag circles to the top and bottom of the foam marshmellow stack. Glue the edges along the side of the stack
-Cut four 13 link chains and then make four rings using the .22 gauge wire
-Attach a ring to each chain and then glue the garbage bag strips around each
-Glue the strips to the top of the bag making sure they're spaced evenly apart
-Use the double sided tape around the top and bottom of the bag and then wrap the garbage bag sheet around it
-Glue the end of the sheet down
-Make a jack stay eyebolt with the .22 gauge wire. Make a 90° bend 1/8" from the eye (ring) of the jackstay eyebolt
-Hook all four chains to the eye and close it (easier said than done, this will test your patience)
-Insert the hook of the bag into the heavy bag frame
You can make all sorts of different training equipment. Look for some reference photos of what you want to make. Try to get an idea of how you might be able to make it and then start gathering materials. While constructing your piece, you might find that some things don't work. Keep trying other ideas until you find something that works. Trial and error is a big part of customizing and is one of the ways that we get better at doing what we do.