
Post by Daremo on Oct 7, 2012 19:36:16 GMT -5
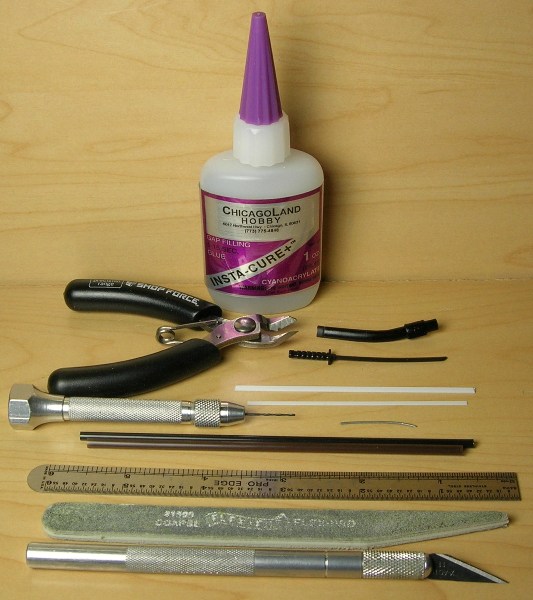
1. Tools
City Strike SE/Target Rescue Mission SE Sword and Scabbard
Super Glue
Exacto Knife
Wire Cutter
File/Sand Paper
Ruler
22 ga Galvanized Wire
2 Coffee Stirrers (1/8" diameter and one slightly larger)
.75 X 2 mm Styrene Strip
.25 X 1.5mm Styrene Strip
Pin Vise Drill
Dremel (not pictured)
Green Stuff/Kneadatite (not pictured)
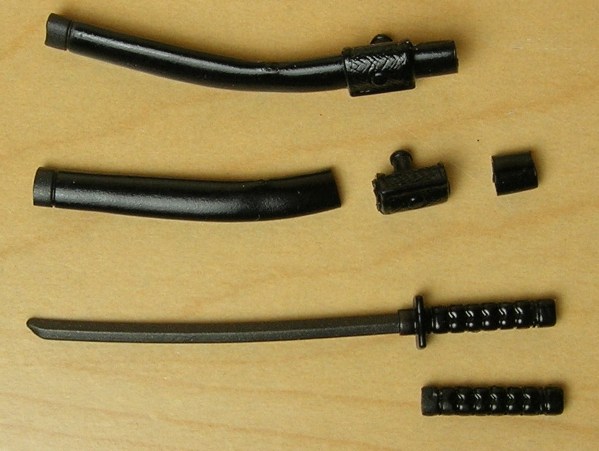
2. Dissect
Cut both ends off of the original scabbard so that you are left with only the peg holder part. Cut the blade off from above the hand guard/tsuba to the tip of the original sword. Remove the hand guard/tsuba and sand it smooth.
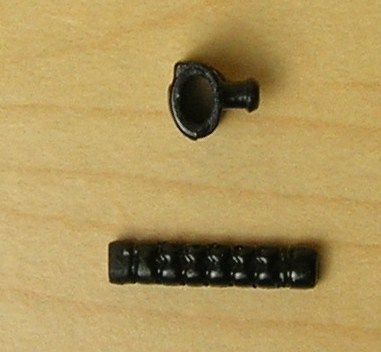
3. Dremel
Dremel out the peg holder so that the smaller coffee stirrer will slide through it while maintaining a snug fit. Take your time and be careful not to damage the peg holder.
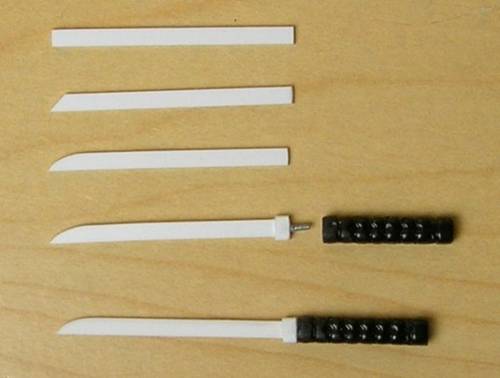
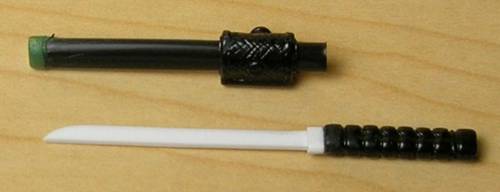
4. Cut, Cut, Shape, Glue, Drill, Glue, Sharpen
I use Obi-Shinobi's technique for making swords with a few changes. Cut a 1 1/8" section of .75 X 2mm styrene strip. Cut a 45° angle on one end and round it with a file or sandpaper. Take the .25 X 1.5mm styrene strip and glue it around the other end. Drill a very small hole (slightly smaller than the 22 ga galvanized wire) in both the blade and the handle. It's important that you drill in the very center of each so that they will line up correctly. Glue the wire into the hole in the blade and then cut the wire so that the blade will fit tightly to the handle. Glue the blade to the handle and sharpen it with a file or sand paper.
5. Top It Off
Cut a section of the smaller coffee stirrer a little longer than the blade and flatten it. Mix up some green stuff and stick it in one end of the coffee stirrer. Take the larger coffee stirrer, wet the end with water, and slide it over the green stuff. It helps to lightly pinch the smaller coffee stirrer while doing this part. Remove the coffee stirrer and let it cure.

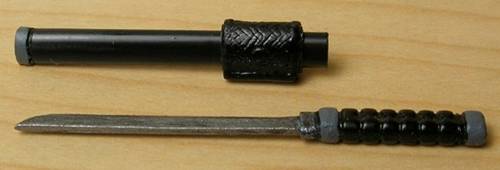
6. Clean Up
Once it's cured, trim off the excess and cut the end to level it.

7. Pre-Paint Assembly
Slide the peg holder over the coffee stirrer and you now have a much more accurate Resolute Snake-Eyes Sword and Scabbard ready to paint.
8. Paint
Time to paint. I'm using Testors Model Masters Acrylics. First, prime the sword blade and scabbard plug. Then paint them both flat black. Once it dries, paint the blade and blade collar steel and highlight with silver. Paint the plug, pommel, and the sleeve/modded guard area gunship gray. After the paint dries, seal it with Testors Glosscote or Dullcote.
City Strike SE/Target Rescue Mission SE Sword and Scabbard
Super Glue
Exacto Knife
Wire Cutter
File/Sand Paper
Ruler
22 ga Galvanized Wire
2 Coffee Stirrers (1/8" diameter and one slightly larger)
.75 X 2 mm Styrene Strip
.25 X 1.5mm Styrene Strip
Pin Vise Drill
Dremel (not pictured)
Green Stuff/Kneadatite (not pictured)
2. Dissect
Cut both ends off of the original scabbard so that you are left with only the peg holder part. Cut the blade off from above the hand guard/tsuba to the tip of the original sword. Remove the hand guard/tsuba and sand it smooth.
3. Dremel
Dremel out the peg holder so that the smaller coffee stirrer will slide through it while maintaining a snug fit. Take your time and be careful not to damage the peg holder.
4. Cut, Cut, Shape, Glue, Drill, Glue, Sharpen
I use Obi-Shinobi's technique for making swords with a few changes. Cut a 1 1/8" section of .75 X 2mm styrene strip. Cut a 45° angle on one end and round it with a file or sandpaper. Take the .25 X 1.5mm styrene strip and glue it around the other end. Drill a very small hole (slightly smaller than the 22 ga galvanized wire) in both the blade and the handle. It's important that you drill in the very center of each so that they will line up correctly. Glue the wire into the hole in the blade and then cut the wire so that the blade will fit tightly to the handle. Glue the blade to the handle and sharpen it with a file or sand paper.
5. Top It Off
Cut a section of the smaller coffee stirrer a little longer than the blade and flatten it. Mix up some green stuff and stick it in one end of the coffee stirrer. Take the larger coffee stirrer, wet the end with water, and slide it over the green stuff. It helps to lightly pinch the smaller coffee stirrer while doing this part. Remove the coffee stirrer and let it cure.
6. Clean Up
Once it's cured, trim off the excess and cut the end to level it.
7. Pre-Paint Assembly
Slide the peg holder over the coffee stirrer and you now have a much more accurate Resolute Snake-Eyes Sword and Scabbard ready to paint.
8. Paint
Time to paint. I'm using Testors Model Masters Acrylics. First, prime the sword blade and scabbard plug. Then paint them both flat black. Once it dries, paint the blade and blade collar steel and highlight with silver. Paint the plug, pommel, and the sleeve/modded guard area gunship gray. After the paint dries, seal it with Testors Glosscote or Dullcote.