
Post by Daremo on Oct 7, 2012 19:23:48 GMT -5
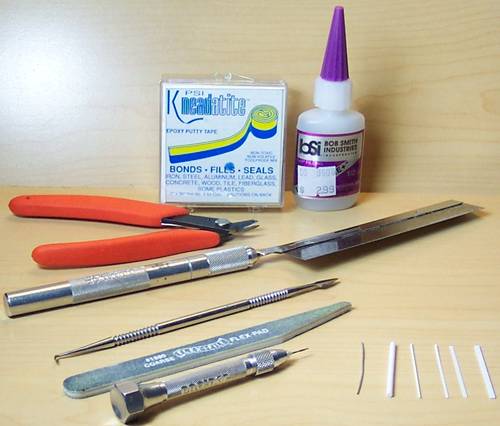
Step 1. Tools and Supplies:
Small Saw
Wire Cutter
Sculpting Tool
Green Stuff (don't forget the water to cut down on the sticking)
Sand Paper/File
3/32" Tube
.88 mm Rod
.75 x 2 mm Strip
.25 x 1.5 mm Strip
.25 x 1 mm Strip
22 ga Galvanized Wire
Super Glue
Small Drill
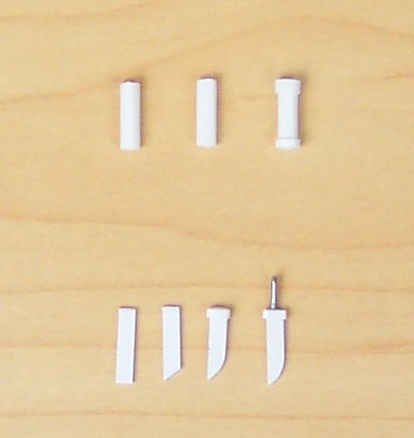
Step 2. Cut:
Let's start with the handle first. Using the saw, cut a 5/16" piece of the 3/32" tube. Sand both ends and then sand down opposing sides of the rod to an oval (1/16"). Now take the .25 x 1.5 mm strip and glue it around the top of the handle. Then take the .25 x 1 mm strip and glue it around the bottom of the handle.
Time for the blade. Take the .75 x 2 mm strip and cut a 3/8" piece. Cut one of the ends at a 45 degree angle and round it with the file. Take the .25 x 1 mm strip and glue it around the other end to make the sleeve. Drill a small hole in the middle of the sleeve end and glue in a 5/16" piece of wire.
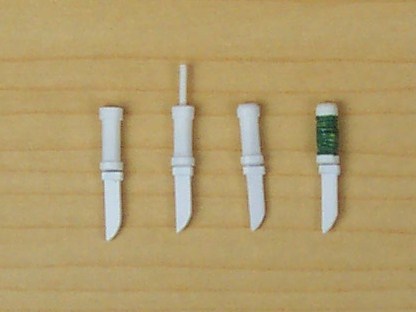
Step 3. Attach and Sculpt:
Glue the blade to the handle (going into the smaller strip side), making sure to keep the flat of the blade parallel to the flat of the handle. Take the 0.88mm Rod and glue it in the hole of the handle, then trim it with the wire cutter. Sand it smooth and the round the end of the handle. Sand the curved side of the blade to make its edge. You can stop here and then paint it or go on and sculpt some handle wraps.
If you want a wrapped handle, cover the handle in a small layer of green stuff. Make sure you don't make it thicker than the strips you glued on it, less is better. Take your sculpting tool and carve even lines (1/16" wide wraps or less) around the handle. Let it dry/cure.
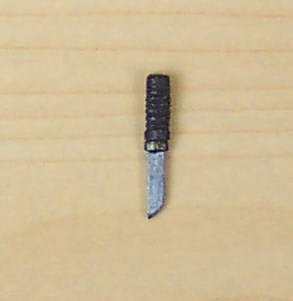
Step 4. Paint:
It's time to paint. I'm using Testors Model Masters Acrylics. First, prime the tanto. Then paint the whole weapon flat black. Once it dries, paint the blade steel and the sleeve on the blade brass. Once the paint dries, seal it with Testors Glosscote or Dullcote. When it dries it's ready for use and will even fit in the ninjas belt as a replacement.
Small Saw
Wire Cutter
Sculpting Tool
Green Stuff (don't forget the water to cut down on the sticking)
Sand Paper/File
3/32" Tube
.88 mm Rod
.75 x 2 mm Strip
.25 x 1.5 mm Strip
.25 x 1 mm Strip
22 ga Galvanized Wire
Super Glue
Small Drill
Step 2. Cut:
Let's start with the handle first. Using the saw, cut a 5/16" piece of the 3/32" tube. Sand both ends and then sand down opposing sides of the rod to an oval (1/16"). Now take the .25 x 1.5 mm strip and glue it around the top of the handle. Then take the .25 x 1 mm strip and glue it around the bottom of the handle.
Time for the blade. Take the .75 x 2 mm strip and cut a 3/8" piece. Cut one of the ends at a 45 degree angle and round it with the file. Take the .25 x 1 mm strip and glue it around the other end to make the sleeve. Drill a small hole in the middle of the sleeve end and glue in a 5/16" piece of wire.
Step 3. Attach and Sculpt:
Glue the blade to the handle (going into the smaller strip side), making sure to keep the flat of the blade parallel to the flat of the handle. Take the 0.88mm Rod and glue it in the hole of the handle, then trim it with the wire cutter. Sand it smooth and the round the end of the handle. Sand the curved side of the blade to make its edge. You can stop here and then paint it or go on and sculpt some handle wraps.
If you want a wrapped handle, cover the handle in a small layer of green stuff. Make sure you don't make it thicker than the strips you glued on it, less is better. Take your sculpting tool and carve even lines (1/16" wide wraps or less) around the handle. Let it dry/cure.
Step 4. Paint:
It's time to paint. I'm using Testors Model Masters Acrylics. First, prime the tanto. Then paint the whole weapon flat black. Once it dries, paint the blade steel and the sleeve on the blade brass. Once the paint dries, seal it with Testors Glosscote or Dullcote. When it dries it's ready for use and will even fit in the ninjas belt as a replacement.